Description of the “D120EB Vertical Illuminator” cylindrical LED lighting system

UPDATE: The illuminator D120EB was designed not for a uniform and powerful illumination but to have infinite combinations of power and directions, some users wanting to use it in the most trivial way, all LEDs sections turned on to the maximum, and this cause more than predictable heating; the safety trigger device, just to avoid to cook the subjects (in case is required, use the tools that you have in your kitchen), turn automatically off the power until the cooling occurred. In the case you need to acquire stacks with a few tens of images is not a problem but for very long sessions is not very suitable.
To have the lighting source always cold, even after hours of operation, the best system which protects even the most delicate subjects, is to turn on the LEDs only during the time of shooting. The new accessory OGGLAB ON-OFF solves the problem. It can be used with any 12V light up to 50W, and most important, can be synchronized to the most common controllers for the stack or used manually
One of the main problems to solve, for those who work with macro-extreme systems, is to be able to operate in an environment in which there is a homogeneous diffusion of light best as possible. The problem is not only the shadows that, in some cases, may be desired, but in particular the unwanted reflections that the specular surfaces create from the metallic carapace of beetles to the hyaline thecae of radiolarians and foraminifera, to the shiny surfaces of minerals and ambers. The result of insufficient light scattering can be observed most clearly when stacking images.
As visible in the following image, the result obtained by photographing the same subject without a diffuser (left) and with a diffuser (right) is clearly different. In this case a normal yogurt pot made of opaque white plastic was used to homogeneously diffuse the light originated from the light source.
In addition to remove the reflections present on the siliceous surface of the radiolarian, the details are better highlighted, allowing a correct analysis of the morphology of the hyaline skeleton.
The use of diffusers characterized by sheets of white paper, yogurt pots, sheets of opaque or semi-transparent plastic, generally involves a significant loss of light, with the consequent need to use longer exposure times, and to be more subject to any external vibrations that could make the image blurred and unusable.
Thanks to the expertise and availability of the OGGLAB laboratory (https://www.facebook.com/oggl.lab), I have the opportunity to test a new vertical lighting system (model D120EB Vertical Illuminator) that uses LED technology.
The system (sympathetically called “the furnace” or the “fryer”) is characterized by an Anticorodal aluminum cylinder (aluminum alloy alloyed with magnesium, manganese, and silicon, characterized by good mechanical properties and excellent resistance to corrosion) with an external diameter of 120 mm and a thickness of 4 mm. The decision to use an aluminum housing was made to better dissipate the heat that is necessarily produced by the LEDs when they remain on during the entire process of photographic acquisition, times that can exceed even 30 minutes, depending on the photographed subject. In order to reduce overheating, a series of ventilation holes located ad-hoc allows the dissipation of the heat produced by the LEDs themselves. The following image shows the system in section as engineered, with holes located at the base and at the top of the cylinder; this allows an induced circulation of air that favors a partial cooling of the system without creating turbulence around the subject, turbulences that are confined only in the hollow space between the rows of LEDs and the diffuser. I say partial because using the system intensively (a few hours), you must pay attention because the temperature of the outer casing becomes very hot; fortunately the temperature of the case is limited automatically if you exceed the temperature of 50 ° C, through a circuit breaker located at the base of the cylinder.

The strings of LED 2835 (from 4000-4500K) are organized in six rings of 84 LEDs each, equal to 504 LEDs in total (with a consumption of 25 watts), and 63 LEDs located under the cover, consuming 3 watts.
The graph highlights the data collected with a probe luxmeter (semi-sphere with a diameter of 60mm) placed at the base of the cylinder; the blue line indicates the values recorded without the interposition of the diffuser between the LEDs and the sensor, while the red line indicates the diffuser is inserted.
To perform the test, the different levels of LEDs and the cover were powered with the same voltage, with a step between a measurement and the next of 0.5 volts. Interestingly, starting from 11.5 volts the curve flattens out, indicating that a maximum yield value is reached, and that starting from 12V, the extra 1/2 volt goes almost all to increase the temperature of the system without a net gain in brightness.

Analyzing the evolution of the temperature inside and outside the “fryer”, during an acquisition of 30 minutes and with a voltage of 10 V, we observe a curve that assumes a logarithmic trend. The internal temperature is lower than that of the external sarcophagus, thanks to the presence of the basal and upper holes allowing a good air circulation and keeping the internal temperature within acceptable limits.
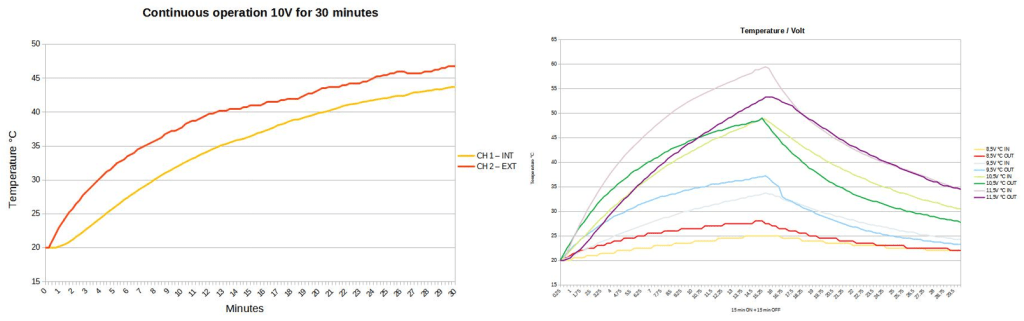
Analyzing the evolution of the temperature as a function of time and voltage (with continuous power supply for 15 minutes, and cooling of 15 minutes), we obtain the series of curves visible in the second graph on the right. Depending on the number of LUX desired (first graph) and the voltage used, it will be possible to know with good approximation the value of the temperature inside the system during the acquisition phase. A solution that is planned to be implemented in short term, consists in powering the LEDs only for the time necessary to shoot (as for a system that uses flash), allowing to maintain the internal temperature equal to the ambient one.
To make the measurements, the top was covered with a white plastic disc with a central hole, and the hole itself covered with black paper to simulate the presence of an optic.
The internal diffuser (removable) is made of PETG, with a thickness of 0.6 mm, to ensure sufficient light transmission, and separates the strings of LEDs from the subject to be photographed, allowing optimal light distribution.
IThe internal diameter of the cylinder is 81mm, and with the lid inserted, the central hole has a diameter of 69mm, enough to accommodate the microscope objective and its adapter rings connected to the lens-tube, without the danger of touching the edge.
The external dimensions are 170 x 124 mm. With the lid, the height is 100mm, while with the lid removed, it is 85mm. The total weight of the cylinder is 570gr.
The illuminator is designed to capture images with a vertically assembled photographic system. The internal diameter is sufficient to accommodate most of the samples placed inside a transparent laboratory glass container (beaker or petri dish), on the plastic support (see below), or in any case subjects with dimensions less than 70mm.
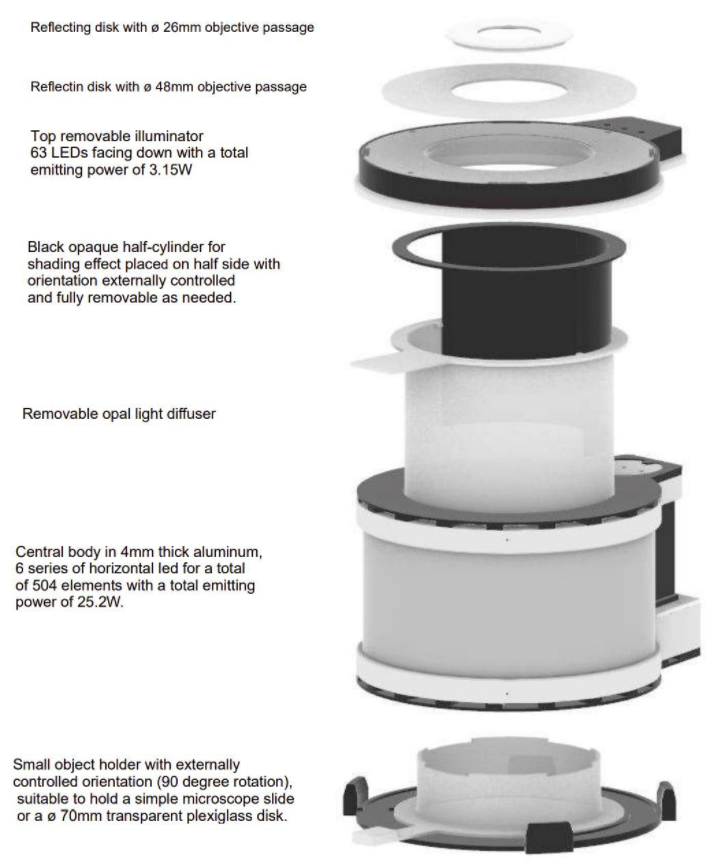
The following image summarizes the system with all the components:
The cylinder being open at the lower end, allows you to use different types of colored background, with the goal to increase the visibility and contrast of the subject.
An interesting function implemented in the lighting system is the possibility to manage via a variable voltage power supply (12 Volts and 3 Amps) and step-down regulator, the intensity of light, and the possibility of turning on / off the different levels of the LEDs.
This allows to manage the lighting on the subject in an extremely flexible way.
The system can accommodate internally a semi-cylindrical black opaque mask that rotates freely 300°, allowing to illuminate desired areas of the subject, and allow to obtain a sense of “three-dimensionality” of the relief (see the final part of this text). This is a particularly interesting function if you work with subjects where you want to highlight the presence of delicate surface structures.
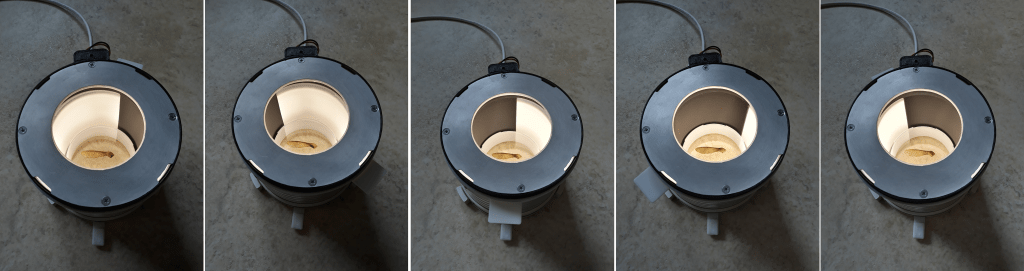
The following image shows the black opaque half-cylinder which, by rotating 300° using a special lever, allows you to orient the light source in the desired direction.
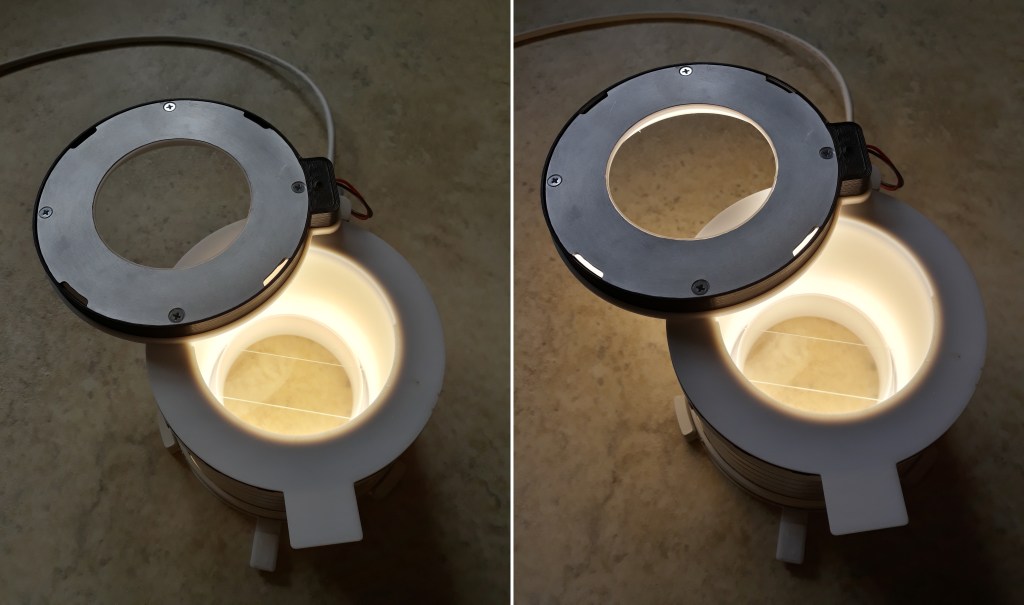
The cover, being equipped with a series of LEDs, allows to have a vertical illumination, a very useful system for acquisitions that require the removal of the relief and/or texture that may be present on the surface of the subject to be photographed. The cover is also easily removable from the body of the illuminator, as well as the diffuser, in order to make special acquisitions or use different types of diffusers made of other materials.
In the picture you can see the cover partially rotated on its pivot, with lighting off (left) and on (right).
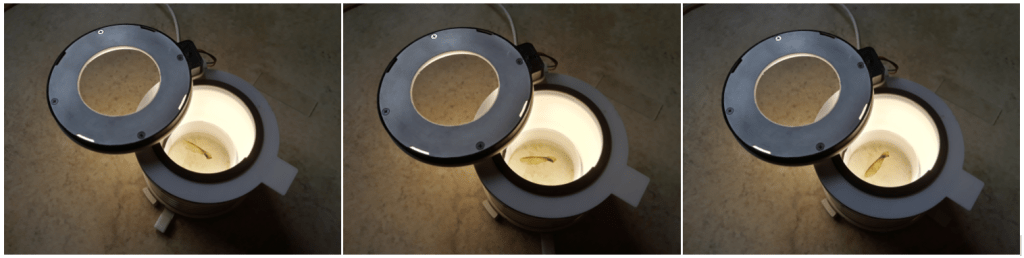
In the next image you can see how some microfossils (elements of crinoids from the Belgian Carboniferous) return different information depending on the direction of illumination. On the left only vertical illumination is used, while on the right the same image is acquired with the use of the opaque mask and lateral illumination. It is evident how the subjects in the image on the left, using a vertical light source, are more “flattened”, while with lateral light the shapes and volumes are better highlighted.
[It is important, in order to have a correct sense of three-dimensionality for the human eye, to always place the light source in the upper left corner. Other positions can induce error, until you give the impression of inverted relief, especially if you locate the light source at the lower right].
The subject (or subjects) that you want to photograph is placed on a transparent Plexiglas disk, fixed with the system that allows the rotation of the support of 90°. The possibility to rotate the support that holds the subject is extremely useful to be able to make precise alignments within the field of view of the camera sensor. It is also possible to remove the transparent support and replace it with a microscope slide of standard size. This is housed in suitable grooves that allow locking, preventing the slide from moving when you rotate the base to align the subject. Obviously, care must be taken to place the slide properly on the appropriate support.
The following image shows the support that allows the rotation of the object holder; the plastic cylinder can accommodate the object slide (left) or the Plexiglas disk (right). A series of colored glasses are provided to replace the transparent base, allowing to obtain different effects of light and contrast, especially on transparent or semi-transparent samples (such as ambers).

Rotation is done by acting on the lever located at the base of the illuminator as visible in the next image.
A push-button panel with five switches, controls the different row levels of LEDs present inside the cylinder and the lid. Consequently, in association with the modulator and the black mask, it is possible to manage the light source according to different levels, intensity, from a particular direction, and from top to bottom, allowing a total flexibility of the illumination of the subject.

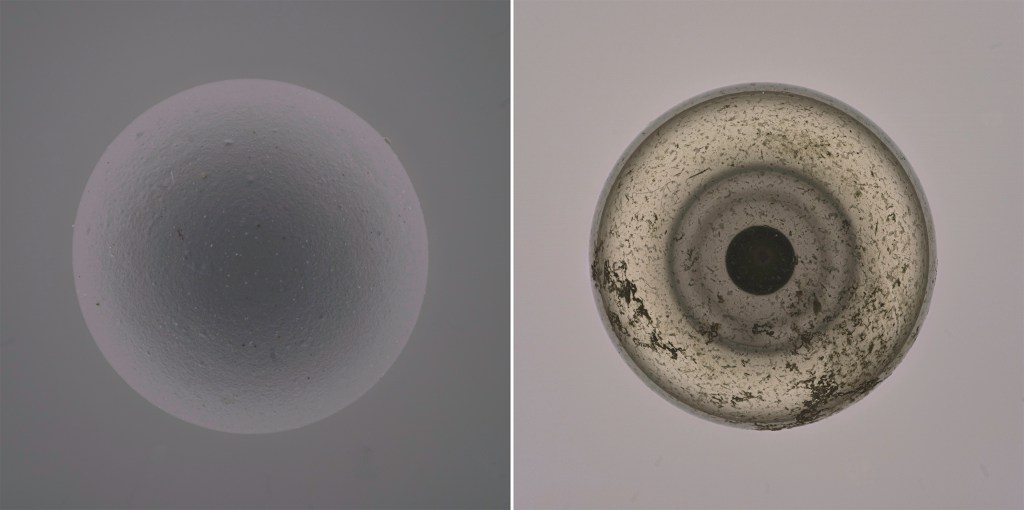
A laboratory test to evaluate the distribution and diffusion of light inside the cylinder was carried out using spheres installed on plastic columns; the resulting images provides extremely encouraging results.
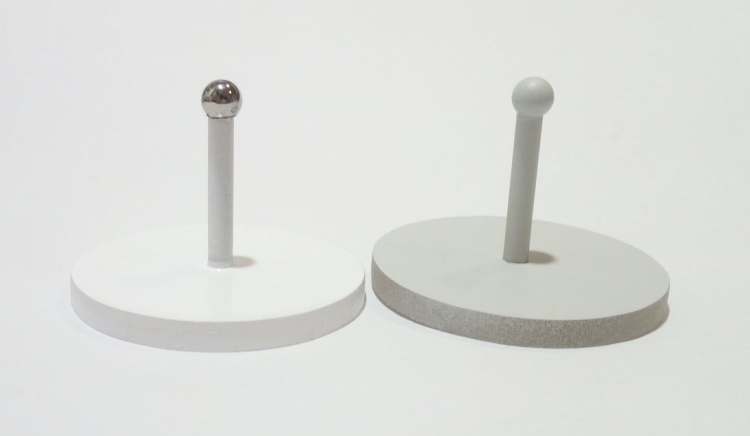
An opaque plastic sphere and a reflective metal one were inserted inside the cylinder, completely illuminated, and a succession of frames were acquired to visualize the possible presence of single bright spots, or to highlight the presence of visible strips of LEDs.
If the LEDs are visible on the specular surface of the metal sphere or a non-homogeneous illumination on the plastic sphere, it would mean that the diffusion is not optimal, and could give rise to shadows and unwanted reflections.
The result can be seen in the two images below. The plastic sphere (left) is illuminated homogeneously over the entire surface, and the test using the metal sphere (test that is among the ‘worst’, at right) is extremely positive. You cannot distinguish the stripes of the LEDs, or the single elements, while the black circle simply corresponds to the lens of the objective reflected on the surface of the sphere. The images were acquired using a Schneider-Componon 2.8/50mm lens, mounted inverted on an extension tube.
In order to optimize the diffusion of the vertical illumination, in association with the lid equipped with LEDs, it is possible to insert a white plastic disc, reflective, and perforated in the center, which allows the passage of the lens only.
The use of this lighting system reduces acquisition times by approximately an order of magnitude of 10 (and more); if under normal conditions using two LED panels of 20W each, I acquire images with exposure times included between 1/20″ and 1″ (depending on the lens used), this system allows, with the same objective and subject, to work with times of 1/60″ – 1/250″, and further reducing the possible presence of micro-vibrations. These times are obviously variable, depending also on the ISO values used, and can still be further reduced by increasing the light power, but at the expense of excessive heating inside the nuclear furnace, with consequent risk of melting of the core (read amber) and with devastating environmental and economic consequences… 😊. As seen above, using voltages higher than 10-11 volts does not increase the brightness of the system, but rather unnecessarily heats the inside of the cylinder.
Most of the system’s components are printed with FDM (Fused Deposition Modeling) technology, in plastic material ASA 275 (Acrylonitrile Styrene Acrylate) resistant to temperatures up to 85 ° C and UV, and powered by a 12 Volt and 4 Amps power supply. It is not particularly bulky and is perfectly suited to the needs of acquisition of small subjects, ranging from fossils with dimensions less than 2 cm, up to foraminifera, ostracods, radiolarians, and diatoms with a diameter of a few tens of microns.

First results
Acquisition on ambers:
the first results are encouraging for the possibility of being able to manage more freely the direction of the light on the subject. Since the aim is to obtain a diffuse light, some acquisitions are more complex in case you want to highlight surfaces that have iridescent colors and that require the presence of a light oriented in a particular direction.

Acquisition of microfossils :
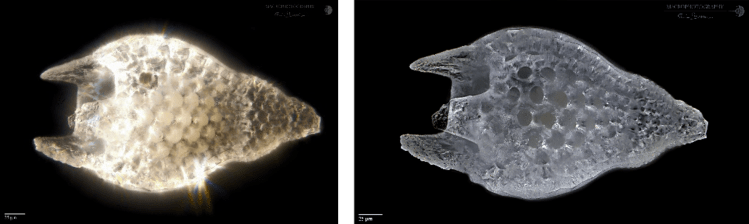
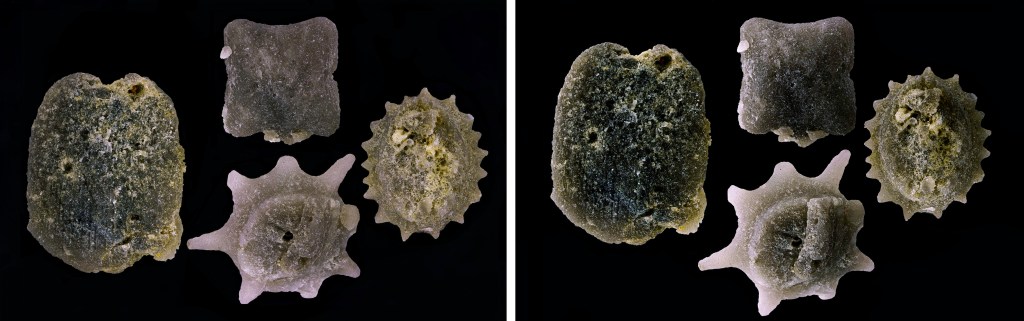
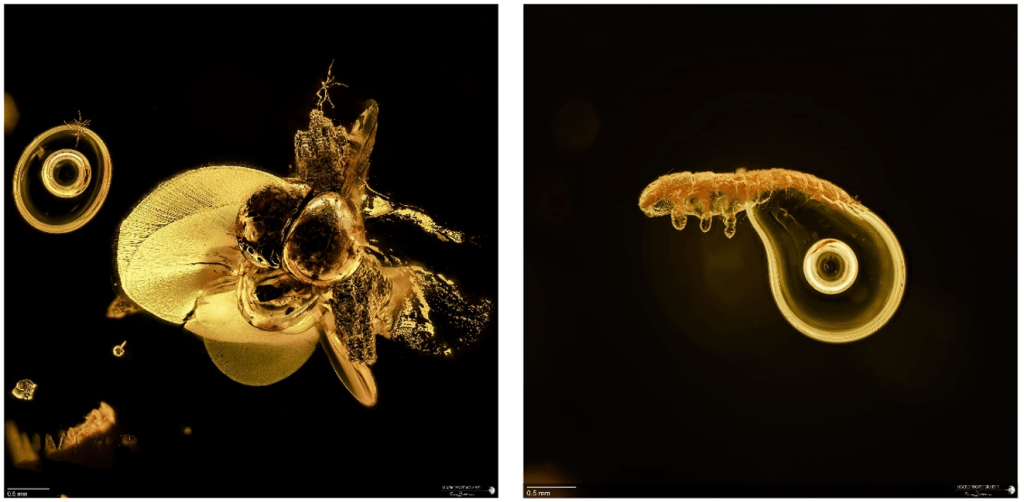
The tests carried out on small subjects such as foraminifera and ostracods have provided more than positive results! Both for the quality of illumination, and for the efficiency in the management of the position of the light source. The following images show two ostracods acquired using the opaque semicircular mask to obtain oriented illumination. The first specimen on the left is opaque (dark), while the one on the right has a hyaline theca; in both specimens no unwanted reflections are observed, and the light is well distributed.

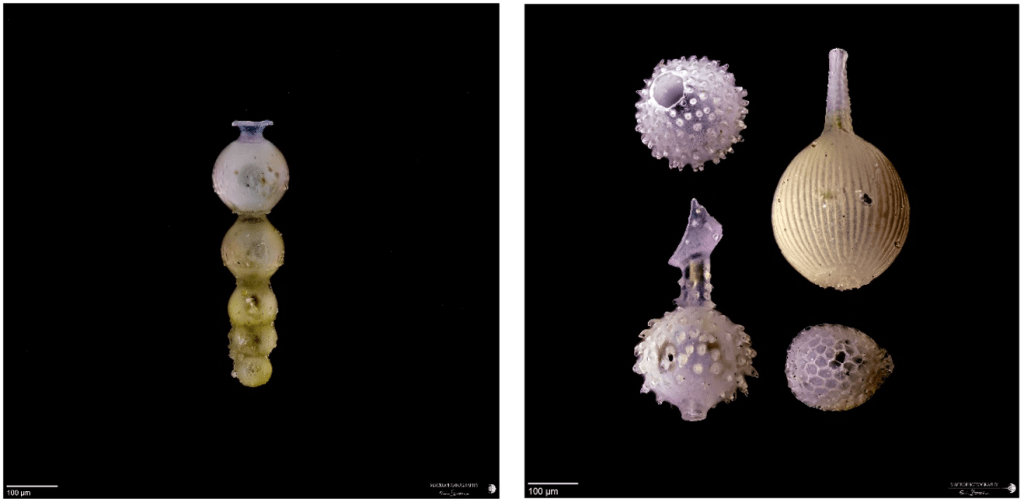
Foraminifera sometimes have very complex surface structures, and the importance of orienting the light source is important to highlight diagnostic peculiarities (or simply to highlight their beauty). In these two images, on the left you can see a foraminifera acquired with the diffuser without a black mask, while on the right the set of 4 individuals was acquired by masking the light coming from the right, highlighting the spherical shapes and the three-dimensionality of the whole.
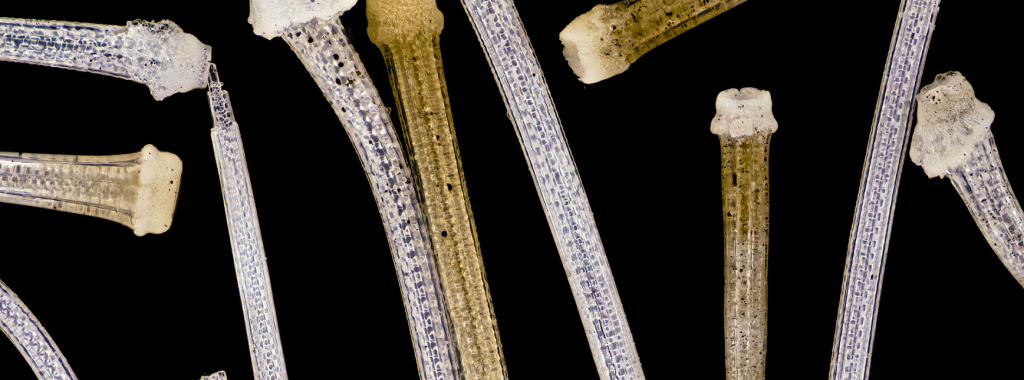
Microfossils that appear hyaline and semi-transparent can often give rise to unwanted reflections, hence the importance of being able to adjust the intensity of light and its direction. In the case of sponge spicules in particular, it is important to keep the light intensity not particularly high, as well as the possibility of being able to position the light source on different levels with respect to the plane on which the microscope slide with the subjects’ rests.

More results will be gradually published on this site (www.enrico-bonino.eu ), on my Facebook page (https://www.facebook.com/enrico.bonino/) and Instagram (https://www.instagram.com/ebonino/ ).
Happy stacking!
