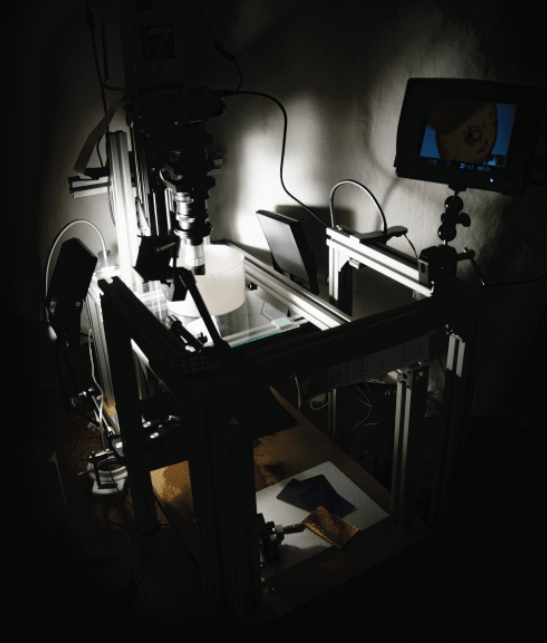
I have been asked to show my acquisition system, the “catafalque” that I set up in order to acquire the images of the minute creatures that you have been the opportunity to appreciate (and for this I thank you infinitely). There is no standard model, and each “macro-photographer” has its own, customized according to the needs, space available, and the subjects to be acquired.
Subject to multiple changes over time, I believe I have reached an endpoint where no further changes to the system are required. Here it is in his beauty :
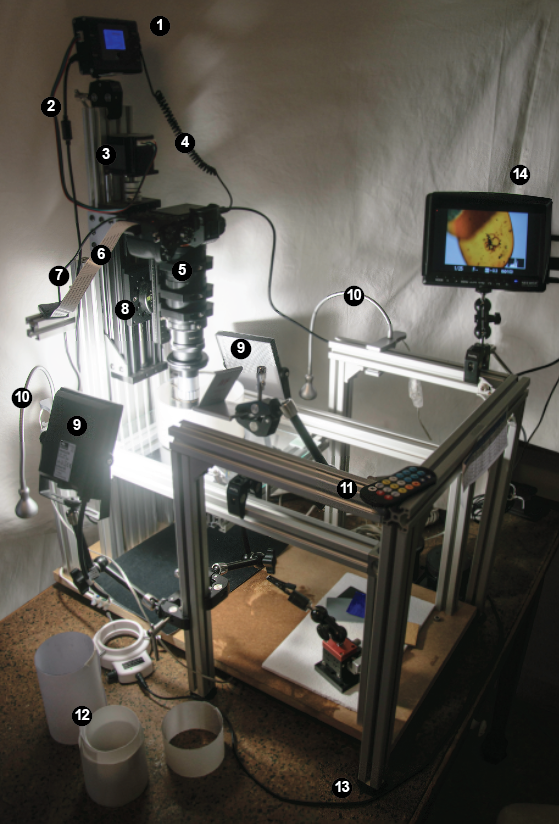
The supporting structure consists of extruded aluminum profiles, with a square section of 30 x 30mm and differentiated into two separate blocks: one that supports the lighting system and the external monitor, and one that supports the motorized rail with the camera and the support for the samples. The separation into two blocks was made to eliminate as much as possible any micro-vibrations created by led panels and support arms. Each foot is equipped with anti-vibration rubber feet (13) and the vertical system is fixed to a composite wooden board 2cm thick. The block containing the lighting can be moved according to the acquisition needs. Being the system “open” it allows a relatively easy access to all components; I have chosen a vertical set-up because the latter allows acquiring correctly the subjects of my interest, positioned on a flat surface. The horizontal acquisition system is instead frequently used for those who photograph subjects such as insects, which in most cases are fixed on entomological needles, and therefore a horizontal system is preferred.
The rail (8) that moves with micrometric steps the camera and the optical tube (5) is firmly fixed on an aluminum V-slot board, allowing to make acquisitions in a vertical position. Un microcomputer with LED screen (1), connected to it and to the camera via a special cable (4), manages the micrometric movement and the number of steps (and therefore the number of images to be acquired), the start and endpoint, the speed of movement, the pauses between acquisition and the following, and other parameters. The microcomputer is controlled (11) via an infrared system, a system that eliminates any vibrations that might be present if a system via USB cable were used.
The rail is managed by Nema 23 0.9 degree bi-polar step motor (400 steps/tour) (3), part of MJKZZ’s QOOL 250 model system (www.mjkzz.de), system calibrated to acquire images up to 50x magnification, beyond I haven’t had the occasion to go. This platform is able to carry a weight of 2.3-3 kg in vertical, more than enough to manage my acquisition system (the camera SONY + tube lens and the heavy Mitutoyo objective, weight 1.520 kg).
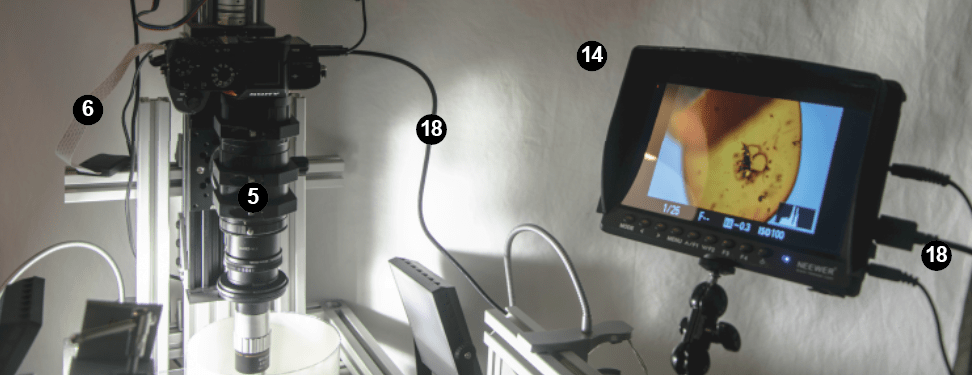
SONY’s mirrorless camera (Model Alpha 7R II) is connected (18) by the micro-HDMI port to an external screen (14) 7-inch LCD 1280 x 800 resolution. This device is particularly useful in order to correctly display the start and ending point of the series of acquisitions, as well as to correctly display the shutter speed and the histogram of the luminance without having to perform special yoga exercises to display everything on the small screen positioned on the back of the camera. The analysis of the distribution of luminance is essential in order to acquire images with a correct balance of light and dark, and not to have photographs too overexposed or underexposed.
The lighting system consists of two 20W LED panels (9) (Dryden model, by Brilliant) and two IKEA LED lamps (Jansjö model, unfortunately now out of production) flexible (10) equipped with clamps, which are extremely useful for illuminating the smallest subjects.
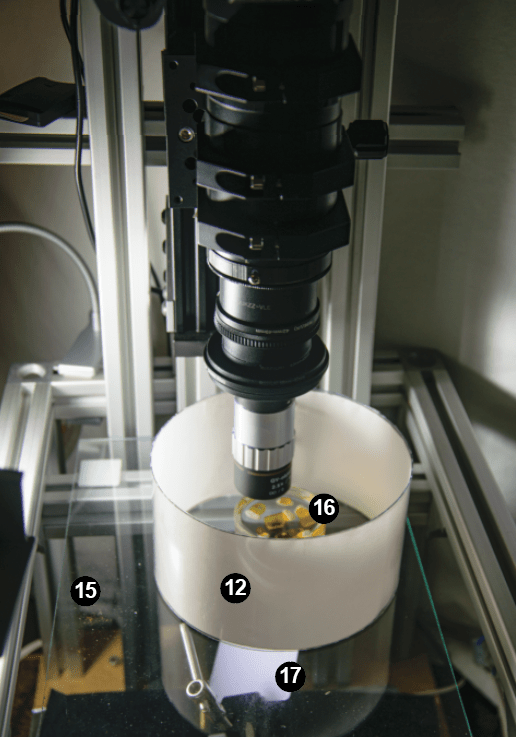
In order to eliminate unwanted light reflections as much as possible, especially when photographing subjects with reflective surfaces (such as beetles, minerals, amber, foraminifera with transparent test, radiolarians… in short, all subjects) one, or a series, of diffusers with variable diameters (8-14 cm) (12) are installed around the subject. The diffuser allows a homogeneous distribution of light, and there are different types (lot of artisanal work) and composition; created according to the type of subject you want to acquire, personally I have used yogurt cans, ping-pong balls, plastic glasses and cylinders wrapped in drawing paper and /or semi-transparent of various sizes. It is important that the paper is white in order not to induce unwanted color variations, and is not very thick in order to avoid altering the colors of the subject and / or lose too much light, the white paper used to make photocopies or semi-transparent for casts are fine.
Resting on a glass surface (15) with felt feet, and at a height of about 20 cm from the base platform is placed the object holder which, in the case illustrated, is characterized by a glass Petri dish (16) in which the amber immersed in glycerin are fixed with plasticine. At the base of the platform is a non-reflective black velvet cloth; this allows for a good homogeneous dark background. In the case of subjects in which the use of a white background (or another color) is required, it is possible to insert colored cards fixed on clams with a moving arm (17), interposed between the base and the glass. These articulated arms equipped with metal end clamps (SmallRig model) are extremely useful for supporting and fixing peripherals to the supporting structure.
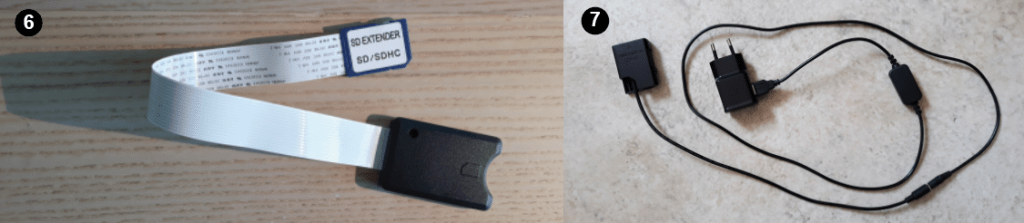
In addition to the external screen that replaces the small camera screen very well, two other peripherals are particularly useful: one is a power supply (7) that replaces the camera battery. This allows you to always have the system powered and not having to extract and recharge the batteries of the camera after 2-3 sessions (sessions that can sometimes last a lot and having the battery low halfway is always not pleasant). A second diabolical instrument is an extension cable connected to the slot that houses the SSD card and where the images are recorded (6). Since it is not possible to connect the camera directly with an external laptop and the processing software (all connections are busy on my system), it is necessary every time to remove the SSD card to insert it into the computer and download the images to be analyzed. This operation carried out repeatedly could risk damaging the internal system, and this would cause much weeping and gnashing of teeth. Instead, using this extension, which also facilitates access to the slot, allows you to safeguard the mechanics.
However, subject to continuous modification, this system is extremely flexible and allows to acquire subjects with dimensions from centimeters to sub-millimetric without any problem.